Saturday, December 6, 2014

Creating a Dandy(lion) Hat

As promised, here is a post about the dandelion hats, inspired by the animated movie Epic. The hats are definitely the most interesting part of the costume. And the most challenging to make and wear. It's fun seeing peoples' reactions when I tell them how they are made. So finally the mystery will be revealed for all to see. I don't know if there is a better, faster way to make the hat but after a few experiments (and with a keen sense of "Safety First") this is what I came up with.

Three purdy flowers

Final materials list: straw hat, plastic canvas circle and rectangle, kid's foam construction hat from dollar store, bamboo skewers, brown and white acrylic craft paint, white floral tape, fashion eyelash trim, white school glue, brown bias tape. There are 80-100 sticks per hat. Over 5 yards of the eyelash trim was used on each hat. I did not track the amount of materials very well. The trim was the most expensive part and had to be ordered online since my local stores didn't restock it after I bought it all!

These are difficult to transport

I started with a circular piece of plastic canvas – the kind used for yarn work. I used a paper pattern to figure out how to turn a flat circle into a head shape. I cut slits in the circular plastic canvas piece and overlapped each edge of the slit, to make the circle into a dome shape. I used twist ties to hold the edges together until I could sew them together. I then cut strips of the rectangle canvas and sewed them into circles of 2 different diameters (to account for increasing diameter of the human head from the top down as well as the thickness of the canvas). The smallest circle was attached to the bottom of the dome shape. The larger circle was attached to the bottom.

Three canvas pieces (L) and final piece sewed together (R)

Each plastic canvas “hat” was sewn inside a purchased straw hat. I had to cut down the brim of the hat first.  The canvas needed to be very close to the hat, so the stitching had to be very tight. (My hands hurt like mad after sewing these all down). I used brown thread and a heavy duty needle.

Canvas base sewn into straw hat

"Eyelash" fashion trim
Each stick was cut to size from bamboo skewers, leaving the pointy end intact. For the fluff, I used white eyelash apparel trim.  After “detangling” each section of trim for maximum fluffiness, I cut the trim into 1-inch pieces. The trim was then wrapped around the stick and secured with white floral tape. They were then hand painted brown and white using acrylic paint – 2 coats each. We had “stick parties” for cutting the sticks, applying the fluff, and painting the sticks.

Sticks ready to be painted

The sticks were then inserted into the straw hat and through the holes in the plastic canvas. After a small area was full of sticks, I would trim the pointy ends and apply white glue at the base of each one and allow to dry before working on the next section. While the sticks are very snug in the canvas, I didn't want to take the chance of driving a stick into the head of my sisters or me.  

Starting to insert sticks into hat

Adding some white glue for additional security

To make the hats comfortable, I cut down a kid’s foam construction hat and inserted it into the straw hat. It makes our heads sweaty, but keeps the stick nubs from hurting our heads. I hand stitched brown double-fold bias tape around the inside edge of the hat to secure the foam hat and hide the messy edges. I don't have a picture of that detail since DragonCon was looming and I couldn't afford the time. Here's a pic of the hat on my foam man-head.


Feel free to ask questions if you plan to make one of these. Keep in mind that they are hard to transport and store. It's a challenge to get 3 of these into a hotel room with a bunch of other costumes! And beware of headaches as ours are pretty snug. Maybe next I'll take on a daisy hat!

Friday, September 12, 2014

Dandelion costumes that won't make you sneeze (much)

Screen shot of dandelion
These dandelion costumes were inspired by the animated movie Epic. They were not a major part of the movie so it was hard to get a good screen shot. I made these to wear to DragonCon in 2013. I made three costumes so my sisters and I could be a fun pack of weeds. I started experimenting with materials and methods in June, although I had been researching and saving ideas for a while. I finished these costumes in the hotel Thursday night at DragonCon. (Familiar story, right?)


Pack of weeds


The full costume consists of 1) purchased hoop skirt, 2) 2-layer petal skirt, 3) underbust corset with petal "peplum", 4) undershirt with elastic neck and arms, and 5) dandelion hat. I built the hats first, since I knew they were going to be the hardest. I will discuss the hat construction in the next post. The base costume was made from Kona cotton.

The skirt includes a simple upper base where the lower leaves attach, and one additional layer of leaves that attach at the waist. There are a total of 3 layers of fabric leaves that decrease in size and length from bottom to top. (Two layers in the skirt and one layer from the bodice.) I added a pocket in each side seam of the skirt, which hides nicely under the other layers of leaves. A simple drawstring waistband was added for adjustable fit.

Base skirt with lower layer of leaves
Two-layer leaf skirt

I made three leaf templates from craft paper for each layer of the costume, varying the total width of the leaf and shape of the jagged edges so they didn't all look the same. There are 3 different leaf shapes for each layer for a total of 9 paper templates. 

Templates used to cut fabric leaves
I decided to use craft paper since I had to make 3 skirts with these patterns and didn't want to risk ruining delicate pattern paper. (Some of us are not always very accurate with scissors.)  Since the craft paper is much stiffer than pattern tissue paper (thus no pinning the pattern to the fabric) and I didn't want to cut into the templates while cutting all those curves, I traced the shape of each leaf on the fabric before cutting.

Traced leaf pattern
To make a more natural edge and to keep the cotton from fraying, the edges of each leaf were “painted” with a fabric glue and hand “rolled” while wet to give them some depth with a curled edge. A center vein was added to each leaf by using a satin stitch over a piece of yarn. I used wooly nylon thread so I could cover as much yarn as possible with the longest stitch length. If the stitch length was too short, the fabric bunched in too much near the yarn. 

Wooly nylon thread over yarn for the leaf vein
The bodice is an underbust corset pattern (Simplicity 1819), modified with a layer of leaves on top that extend over the skirt. Steel boning was used in the corset since I wanted this costume to last a while. I also made bias tape from the cotton fabric to bind the corset layers. 

Back side of corset before lining was attached
The leaves are attached to the bodice only at the top, so they hang down past the waist. I used fabric glue to keep the corset leaves in place since I didn't want any stitching to show or the under part of the corset to show. 

Fabric glue used to keep the top leaves in place
The shirt is a simple ren-style blouse with elastic around the neckline and bottom of the sleeves. I set the elastic about an inch or more from the finished edge to create the ruffled look.The total fabric yardage for skirt, leaves, undershirt, and corset was around 5 yards.

I bought really cheap hoop skirts to go under the skirts. Really cheap. The bottom of each hoop skirt was painted with matching green acrylic paint mixed with fabric medium. The fabric medium keeps the cheap hoop fabric from being stiff and crunchy. I only painted the lower portion of the skirts, so white still shows through sometimes when we move around. I found that the leaves needed to be tacked together to keep from fluttering. Although a little bit of flutter is pretty neat.

For a little added flower power, we wear white feather eyelashes purchased from Amazon. We add white and/or green eye makeup if we feel like it. The eyelashes get almost as many compliments as the hats!
 
Funny sister face

The finished costume is fairly comfortable (aside from the hat). Stay tuned for details about the dandelion hats.


Tuesday, September 9, 2014

Been a while, 'eh?

I told myself I would update this little blog for my own sake. Documenting my costumes really helps me see how far I've come. So this will be a place holder to remind me to add some stuff. Most notably, I intend to post pics and process descriptions for my dandelion costumes. I also plan to share about my never ending obsession to collect, sort, categorize, and document. I love an excel spreadsheet for tracking my mounting stash of fabric! So I hope I will hold myself accountable and document this amazing adventure.

In the meantime, here is a picture of the dandelions!
From DragonCon 2013

Sunday, December 9, 2012

The Making of Ezren

So the hubby wanted me to make an Ezren costume (an iconic character from Pathfinder). We planned it for months: choosing fabric, picking patterns, buying props. And suddenly it was 2 weeks to GenCon, where the costume was to be premiered. In an all-out sewing frenzy, I made this costume in 9 days. An impressive feat for my somewhat novice skills. This was also my first time to create a costume from a known character. Since it's not really a technically-challenging costume, I'll share the highlights of design and construction for anyone interested.


Illustration of Ezren

Fabric - linen would have been ideal for the character, but it wasn't on sale the day I went to the store. I bought a linen/rayon blend, which is cheaper per yard and has the added bonus of wrinkle resistence. The downside was the color - not as deep a blue as we would have liked. Lining was with cotton. Pants were also cotton. Heavy craft interfacing was used for the front panel.


Ezren costume Day 1 of 9


Cutting interfacing for belt, front panel, and faux sleeves

Patterns  Ezren's costume has many layers, even though simple in design. The hubby and I discussed at length the various ways to achieve the layered looks without actually adding too many layers. The shirt was a basic short sleeve pattern with gold trim on the sleeves and lacing at the neckline and short misson-style collar. I used McCalls 5907 as a base for the ankle-length robe/tunic with hook and eye closure in back. I altered the pattern to add a V-neck, open the side seams down to the waist, and add a front slit. I added a facing to the v-neck part since the linen was so soft. I also added the faux sleeves inside the tunic to create the layered sleeve look. The sleeve inserts are attached along the neck line from the back closure almost to the bottom of the V-neck.


Back lacing on belt

The "overskirt" panel layer is just an elastic pull-on "skirt" with the shape of front and back panels drawn out as needed to achieve the front and back slits and the curving at the sides. (Two pattern pieces cut on the fold, with fold down casing for elastic) The top front panel was combined with the fabric belt into one piece. The belt and panel pattern was self-drafted. The belt is pull-on, with lacing in the back to adjust the fit.  The hood and mantle were modified from the M5907 pattern to be less full. Pants are simple elastic pants from Butterick 4574.


Runes painted onto edge of faux sleeve

The runes and edging were painted on with a brush. After testing a variety of paints and colors, I used Jaquard Lumiere fabric paint. Remember not to use fabric softener when you prewash your fabric. I bought some fabric painting brushes, and that was a great decision. I usually go with cheapest, easiest tools I have, but sometimes you have to buy the right tool for the job. Found a nice little set at Hancock. The runes are actually The Charm of Making translated into "old elvish" Tolkien-style. I did mark the edges of the border stripes before painting, but the stiff brush made it easy to keep the lines a uniform width. I only did one coat of fabric paint, although I did use heavy coverage.


Runes and trim on upper part of tunic

The trim on the belt, front panel, and paneled overskirt are double-fold bias tape. I topstiched it since I didn't have the time to do anything else. The outside corners are not properly mitred. I did fold them under to look like they were. (from a distance anyway!) The parts that gave me trouble were the sharp inside corners on the panel skirt. Found lots of tutorials for making that turn with single fold tape, but few for double fold.


Lower half with front panel, overskirt, tunic, pants, and boots
I had been collecting new and used pouches and belt accessories on ebay for months. I prefer to buy used items when possible, but some items are new. The double pouch on the baldric is an old ammo case and one of the belt items is an old camera lense case. The jewelry parts were from Hobby Lobby and Joanns. The jewels on the panel skirt are earring bases with hoop bits snipped off and then painted a less garish gold (non-toxic primer and regular craft paint) Then acrylic gems were glued on. The pocket watch came from the thrift store ($3) and we painted the outside face blue (it had a duck on the front).


Boots came from Amazon. Hubby adds gel inserts to make them wearable. This pair has a weird plastic feel on the inside, so they don't breathe well. But they look great! We don't have the right gloves, a cross-bow, or staff yet. The only other thing he was missing was the white hair. We'll see if he's up to wearing a wig next year. The hubby was pleased that he tied for first in the Paizo costume contest at GenCon.


Ezren art by Wayne Reynolds


Wicked "Cabbage" update

So, um, it's been a while since I updated this blog. Oh well, I'm back for now.

So, here's a picture of the initial stage of the "Cabbage" (inspired from the musical Wicked) costume worn at DragonCon. I have to say my sister loved the skirt. And I loved making it. I've made some improvements since then, which I'll discuss below.

One of the foreseen problems was how much the skirt might be weighed down by the peplum of the bodice lying on top of the skirt. The skirt did lose some fluff, but was still pretty big. In this picture, there are two plastic hoops in the skirt. I've added another hoop in the middle and that has added some support to carry the weight. I also removed some fabric at the top of the skirt to make it sit higher on her waist. (Really I just made a new fold for the drawstring casing)

The other foreseen problem was that the bottom layers of tulle rolled inward toward the legs. One tip for this that I read about for real tutus was to hand-tie the layers together. I tried that to a limited extent. I made about 20 ties with regular thread connecting the botton 5 layers and that didn't really seem to do anything noticable. And I just wasn't interested in tieing each layer together (Lay-zee). Sooooo, I added a casing to the inside of the skirt base, just below the bottom layer of tulle, and stuck a piece of plastic "boning" in there. That worked to keep the bottom layers rolling in on your legs - BUT it limits the range of motion in your legs. You can still stand with legs wide apart and walk in big strides, but definitely no high kicks in this thing.

One thing to keep in mind - this free plastic "boning" requires some work to make it work for you in this skirt. It may be because I sewed the casings on before gathering the frills (therefore a lot more casing material to push the boning through), but if the tension on each little section of casing isn't just right, the hoop will rise and dip in spots. So you have to adjust it each time you wear it, and that can be time consuming. And then it will probably need readjusting after being worn.

Sewing the casings on after gathering may be the solution for next time. It will certainly reduce the frustration of inserting the boning. I have no idea how steel boning or the better plastic boning would improve the eveness, but I don't have the bucks to test it.

This is one of my favorite pics - I call it green monster eating my sewing machine


I didn't get good posed pictures of the improved skirt, but you can see how much "perkier" it looks. And the reduced leg ranfe from bottom inside hoop didn't bother her at all. 


Wednesday, September 28, 2011

Wicked Cabbage - or almost

Aaaaaahhhh - so DragonCon is behind me (sniff) and now I have time for leisure again. So while the Wicked cabbage skirt turned out awesomely, it wasn't quite what I was hoping for. The last blog left off with the making and trimming of the layers. I think it was 21 layers of tulle/net, ranging from 12-13" to 5-5.5" wide. I should have made the top layers smaller, so that there wasn't a 7-inch difference between the top and bottom. If I were to do it over, I would make the top layer 10" or less. As I had feared, the bottom 4 or 5 layers turn to the inside when the skirt is worn, thus rubbing against the wearer's legs and not providing the sharp finish at the bottom. I have not remedied that situation yet. But here's how I got to the current point.

I had to decide how far down from the waistline to begin the frills. I knew the bodice would have a wide peplum that would cover the blank part near the waist - so I just needed to decide how wide the peplum would be so I would know how much space to leave above the first frill. I think I left a little too much, but I can always shorten the base skirt at the waist and put in a new casing. I ended up about 5 inches from the top of the waistband of the base skirt.
First layer pinned to skirt, seam pointed down

First frill added to base skirt
Starting at the top, I sewed each frill along the base lines I had drawn on the skirt. Each frill was sewn with the seam allowance pointing down, so you wouldn't see it on top of the frill. This also helps the frill stand better, so I've read. Not all layers are straight across and not all layers go all the way around. It is against my engineering nature to make things so random, but I managed. I worked my way down to the smallest frill near the bottom of the skirt. The first few layers go on quite well, but once you get to the 7th or 8th, the volume of the thing starts to fight back. I ended up using twine and safety pins to "squish" the layers together to make it more managable under the sewing machine. By the end, I was starting to question my sanity. The last layer was sewn with not the kindest of words.
Sewing the frills down
Sewing frills - closer to finished now

Frills being pinned to skirt
Pinning the layers to the skirt was probably the most tedious and time consuming part. I'm glad I had 1-inch intervals drawn onto the skirt. I should have made them 1/2-inch intervals, but I put good use to the ones I had. With this net and tulle, you need to pin A LOT to keep the frill along the line you want. I placed the skirt on my sewing board, to keep from pinning other parts of the skirt. I would have loved a wider surface so I could pin more at one time before having to shift the skirt to the next section. It would have been much easier to have each line drawn on for each frill - some were slanted, some were not all the way around, some doubled back on themselves - and just pin along the line instead of making new lines as I went. But that would have required more planning than I was willing to do at the time. Since this was a big experiment, I didn't know how to plan.


Frill pinned to skirt
Three hoop layers were inserted in the top third of the frills, middle, and bottom third. I ended up using the top and bottom hoop layer only due to time constraints. I will likely add the middle hoop later. I used plastic strapping from the lumber department at Home Depot for cheap "boning". I wasn't willing to cough up the bucks for steel until I knew how this would turn out. I cut the strapping in half - to about 1/4" width. If there are snags on the boning it will catch on the net, so be sure to sand down the uneven spots before inserting it in the casing. I couldn't get the boning to lay flat (another point for steel no doubt), but I don't think it really matters in this case. The real trouble came in trying to adjust the frill layer to make a level hoop. This is not easily explained, and I've not solved the problem yet, but you can the see "worst-case" uneven hoop layer in the picture. I got pretty close to even by adjusting the gathers around the casing. This may be solved by adding the casing AFTER the frill has been gathered, but I added the casing first. I will say it is a pain to insert the boning into this much casing, especially since it is gathered. I imagine the edge of the frill may stand out more if the boning would lay flat in the casing, or perhaps a 1/8" wide boning rather than 1/4". Another thing to test.

Uneven plastic hoop before adjusting tension
Adjusted hoop layer

The skirt could stand up on its own - even without the boning in. Quite frankly, it would make a cute skirt upside down and can even be worn without the hoops for a softer look. I told my sister I might add a casing to the bottom so it could be worn either way. If I don't have to do something weird to it for the roll-under problem, that is.
Completed skirt, upside down
There is still a little of the base skirt left at the bottom (maybe and inch or two in some places) and I've not decided whether to cut that off or add a casing for a hoop. As I said, the bottom of the skirt folds inward and it's not supposed to do that. I need to prevent the roll-in with some structural stability at the bottom or tie the frills together and pull them up with tension. Something to work on.
So with a few corrections needed, the skirt is complete. And pretty darn cute if I do say so myself. I put more hours into this skirt than any other costume I've made. I spent so much time with it this summer, I almost felt like it was my child. I was sad to give it away to my sister, but was so thrilled that she loved it. Next post will include pics of the top (work in progress) and completed (sort-of) costume.

Monday, June 27, 2011

The First Wicked Costume

The first costume of the Wicked trio is "the cabbage". The crazy tutu-like skirt is where I am starting, as I have no idea how to make it. I have collected quite a pile of green tulle and net to make the skirt. Since I didn't know where to start, I began researching the construction of a pancake tutu. This skirt will need to stand out straight from the body, similar to a tutu, and has gradually decreasing widths in the layers of ruffles.
"The Cabbage" from Wicked
For tutu information, I found the Ballet Talk blog on Live Journal and tututoday.com. These were by far the best resources for construction tips. You don't want the no-sew tutu videos. The main pointers I learned were: use the right fabric - stiff net made for tutus; plan to put many, many hours into the construction; a hoop layer will likely be needed; press each layer after it is gathered and before you sew it down.

I did not buy the tutu fabric. It was cost prohibitive for me as this skirt requires much more fabric than a tutu. I'm going with tulle and nylon net that I bought at JoAnn and Hancock Fabric. I hope it works out. I tested various spray starches, homemade starch, and fabric stiffener to see if I could make the fabric stiffer. Nothing worked well enough for the trouble in the initial phases as a flat piece of fabric. I have read in the blogs about using spray starch on constructed tutus, so maybe it works better after the garment is made. Gathering and pressing the layers seem to improve the stiffness. I used seven different fabrics in four colors of green: 3 colors of tulle and 4 colors of net.
A stack of layer pieces
I knew I would need a base to sew the layers of ruffles, so I made a simple straight skirt out of cotton. I made a draw-string waist since the frills would start about hip level (wouldn't have frills above the hip area) and I didn't want an opening in the back of the skirt for a zipper or such. This way, the skirt should go over the hips well enough and the gathering at the waist from the drawstring will be hidden by the peplum of the bodice. After the base skirt was constructed, I drew lines at 1-inch intervals, starting from the waist, that I will use as a guide for sewing the frills. The lines aren't perfectly even at the sides due to the flare of fabric at the hips, but I don't think it will matter in the end.
Base skirt with 1-inch guide lines
Based on standard widths of pancake tutus, I decided to cut the top layer at 13 inches. One-half inch will be lost as seam allowance to the base layer, so the top layer will end up being 12.5 inches. I cut each layer of fabric at 1/2-inch intervals from 13 inches down to 5 inches. 13, 12.5, 12, 11.5, ... 6.5, 6, 5.5, and 5. And to make matters more complicated, many of the layers do not go all the way around, so I added 5 additional layers to fill in and made some layers shorter than others. Some of the layers are also at angles rather than straight around, so I'll probably end up drawing some additional guidelines on the skirt to incorporate slanted layers.

To calculate the length of material needed for each layer, I measured set lengths of fabric before and after gathering. Once I picked the tightest gather I could get on the ruffler foot, I used that ratio to calculate how long each layer should be. For instance, if a 60-inch strip of fabric was reduced to 8.5 inches after gathering, I would use a ratio of 7. I then measured the actual cirmcumference of the base skirt along the drawn reference lines. Each frill layer would need to be the circumference measurement multiplied by the gathering ratio. So if my skirt circumference was 45 inches, the frill would need to be 315 inches.
Frill layer going through the ruffler foot
Each layer was about 5 or 6 pieces sewn into one length, with each piece cut across the width of the fabric rather then the length. I found the cutting easier this way. Since I wasn't overly concerned about perfect width for each layer, I opted for an easier cutting method for the tulle and net. I would fold the fabric in half along the length, then fold in half two more times to make a narrow length of fabric to cut. Then I would measure the width of the frill layer as I cut. Not very accurate, so don't cut this way if you don't want slight variations in the width of your frills. This tulle and net was difficult to line up and cut, so I chose sanity over perfection. Most of the frill layers are 5-6 pieces sewn together. I labeled each layer so I could keep track easily.
Pile of frill layers prior to gathering
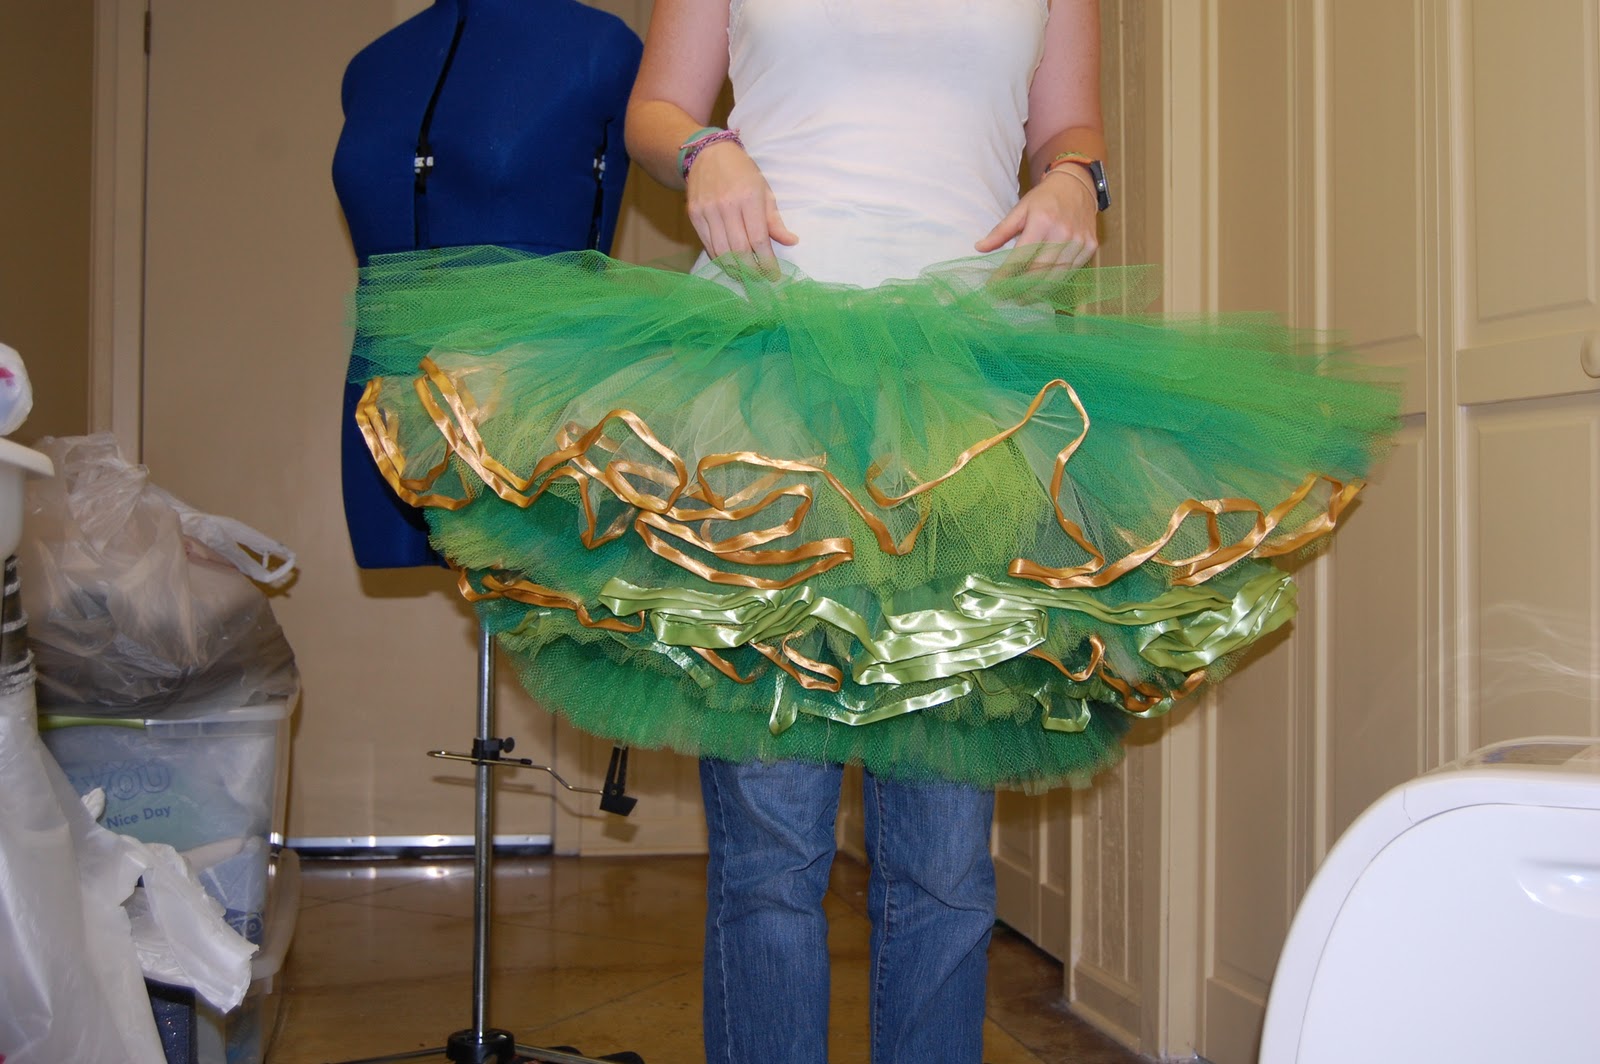
I decided to add a ribbon edge to 4 of the tulle layers. I used satin ribbon folded over. I ran 10-lb fishing line inside the ribbon as I sewed as this helps the edge of the tulle stand out.
Satin ribbon sewn with fishing line inside
Ribbon trimmed tulle (pressed on the right and unpressed on the left)
I used bias tape on 3 layers to use as a hoop casing. The upper most hoop layer is the 5th from the top (which is the 11-inch layer) and the outer edge of the bias tape is about 8 inches from the inside edge of the frill layer. I sewed the casing on before I gathered the frill, as I thought this would give the layer the most volume. I've read that some people use strips of net as the casing, but I thought the net was more difficult to pin and sew. I've also seen instructions to sew the casing after the frill is gathered. That may be more appropriate if you want your frill to be flatter. The second hoop casing is on the 8-inch layer and the third is on the 6-inch layer. Each casing layer used 3 packs of 4-yard, single fold, bias tape, so 9 packs in total. I have no idea if I will need 3 hoop layers, but I know it would be easier to add the casing now rather than later.
Bias tape pinned to net for hoop casing
Gathering the frills with the ruffler foot was super fast and easy. After they were all gathered, I pressed each layer. Now they are ready to sew on to the base skirt.
Pressing the frills, which are pinned down to the ironing board

Pile of pressed frill layers ready to sew to base skirt